Thursday, June 30, 2011

neutral eye make up tutorial

I haven't done one of these for awhile, so sorry for the lighting! The key to this look is the eyeliner. You have apply with a heavy hand and reapply several times to get that precise line.

I did my right eye for the tutorial and it took foreverrrrr. I did my left eye in maybe 2 minutes or less and it came out looking way better! Maybe it was b/c I was so scared about messing up. So this is the full shadow look on the left eye/ what it should look like before you line the eyes:

Photobucket

In my experience, the key to getting a gentle gradient is:
1) Use a heavy hand on the dark shadow. Don't be afraid!
2) Use a light hand on the very light shadow/ highlight.
3) Don't overblend. Let your skin melt the colors together.

As always, I started with an eyeshadow primer. There are so many on the market now, but I stuck to my basic Urban Decay Primer Potion.

Step 1: Use a dark brown (I used a Makeup Forever in Espresso) with a slanted shadow brush. You want to really pack the color onto this brush and draw a V on the outer edge of your eye. Start on the outer corner and fill in your eyelid up to the crease, easing off around 3/4 of the way into the eye.

Photobucket

Photobucket

Photobucket

Step 2: Using a dark brown, blend starting from the middle of your eyelid inward almost to the inner corners. Sorry, I don't have an exact product for this palette. I got it from my sis-in-law.

Photobucket

Photobucket

Step 3: Using a bright copper or some shimmery gold, apply color to the area right above your crease and smooth out the dark brown edges. I used that wide fluffy brush you see in the pictures.

Photobucket

Photobucket

Step 4: Get a light, shimmery beige (I used Stila's cream eyeshadow in Kitten) and apply it lightly to the inner corner of your lids. I used my fingers and tapped the color on gently.

Photobucket

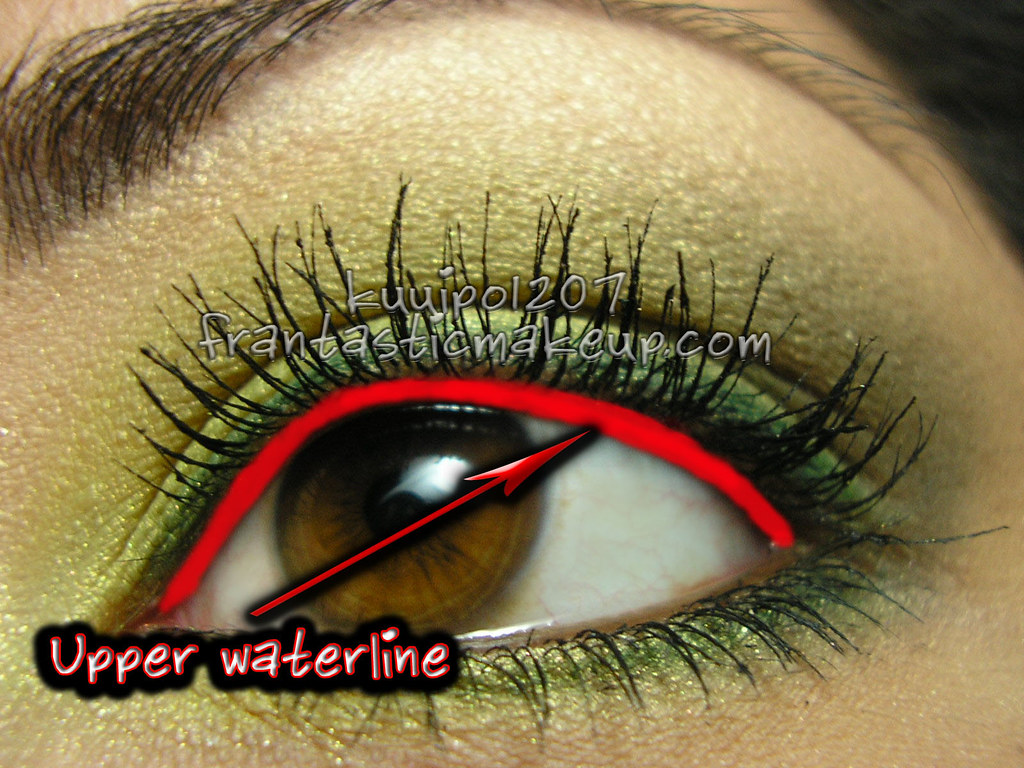
Step 5: This is the most important part!! Use a slanted eyeliner brush and gel eyeliner to line your upper lashline. Use the pencil liner to line your upper waterline. (Here are some great references from Frantastic. This is the lashline and this is the waterline.)

I used MAC gel liner in Blacktrack and drew a line starting at the outer corner of my eye about 3/4 of the way in. Then I used the pencil liner to draw a black line all along my upper waterline.

Photobucket

Step 6: Then I used the slanted eye shadow brush from before and drew a line using the eye shadow on my lower lashline starting from the outer corner and stopping 1/2 way in. This is how it should look so far:

Photobucket

To line the upper lashline with the gel liner, I followed the natural shape of my eye and slightly flicked the line upward at the outer corner. I made sure that the line I created with the eyeshadow connected with the color on the upper lashline.

Step 7: Finally, I used the pencil liner to fill in the inner corner of my eye. As you can see, I had to draw a little bit outside of my lashline into the actual fleshy corner. If you only follow the lashline, you can't really see the eyeliner on the inner corner. I also filled in the bottom lashline with the pencil liner.

Photobucket

Step 8: Finally, I curled my lashes and added mascara.

Photobucket


Friday, June 24, 2011

How to lighten black hair at home

I have very black hair, which makes it a challenge to lighten at home. Thank goodness there's the internet! Here's the collective wisdom that I've gathered and my own at home experiment.

THE SUPPLIES

Developer

The developer is typically hydrogen peroxide. It is the oxidizing agent used to open up your cuticles so that the color dye may be deposited. Developers can come in a creme or "clear" formula. The creme formula has conditioner and the clear doesn't. They serve the same function.

Developers come in different strengths known as "volume." The volume starts at 10 and ends at 50. In a typical drug store box of hair dye, they include a 10 or 20 volume developer. 10 is used to add a tint of color and 20 is used to lift the hair color by one or two shades. Sometimes bleach is added to developers in order to dramatically lift the color of the hair.

Color
This is the pigment that will be deposited in your hair.

Choosing a color

Just look at the picture on the box, right? This has never worked out for me. First, you will want anything with ashe in the title, because the blue tones in the dye will prevent your hair from turning orange. Avoid words like "warm" or "golden." Secondly, get the lightest shade of blonde you can find. Black hair is very difficult to lift, so don't worry about it turning out too light. The lady in the picture of my box was practically albino, and my hair is barely medium brown.

Toner

This is the corrective color and people usually use it to correct brassiness (orange tones) in their hair. You can mix the toner (which is a special kind of hair dye) with a developer and apply it as you would hair dye. Toners come in different colors, so you have to see how the dye turned out in order to pick the correct color.

THE PROCESS

I was all over the place with this process, so I'm just going to show you what I used and how I did it.

Photobucket

You can see that I have a my developer, a box of hair dye and a tube of hair color. I first mixed the developer with the tube of color and found that it wasn't light enough.

I then bought a box of drug store hair dye. I ditched their developer (which was in the white narrow top bottle) and mixed my developer with their dye. I used a 1 to 1 ratio. I'm not sure if this is correct, but it worked for me.

I kept the first dye in my hair for an hour with not much lightening. I kept the 2nd dye in for about 35 minutes. I did a strand test first, so I'd recommend doing this to see how long you should keep the dye in your hair.

Photobucket Photobucket

The first one is a typical developer that you can find at Sally's Beauty Supply. I got it for about $2. The second one came in a bleaching kit. (I tried to give myself highlights, chickened out.) The bleaching kit came with 40 volume developer. Both were clear.

After the initial dye, redye and all of 10 minutes of bleaching highlights, my hair came out to be a medium brown. It's a bit more red than I like and I haven't had a chance to fix it with toner. I'm giving my hair a rest for now and will update if I do change it again.


Saturday, June 18, 2011

post preview/ wavy hair how-to

New color. (Will detail how I did this at home in the next post.)


Wavy hair how-to

1. Start with damp hair, about 80% dry.
2. Grab your hair close to the nape of your neck as if you were about to tie it into a ponytail.
3. Loop your hair around your thumbs over and over until you get to the end. You should have a bun by the end.
4. Using a hair tie, secure your hair into a ponytail and then wrap the rest of the hair tie around the bun.
5. Take out the bun after your hair has dried and apply hairspray.


Wednesday, June 15, 2011

catching up with pictures

The downside to studying for the bar is that I get extra cautious. More than once, I thought to myself, dang, better not defame anyone on the blog. I am going to regret staying up to make this post tomorrow. Oh well, on with it.

What have I been up to?

Graduation!

I don't have very many pictures from graduation, since I forgot my camera in my car. I've been getting bits and pieces from friends and my parents. Here are two of my faves:

Photobucket

We're missing one.

Photobucket

Waiting for our names to be called. Nghiem, Nguyen, Nguyen, Nguyen. Overrepresented this year.

Engagements!

Photobucket

This is my lovely cousin who has been in a relationship with the same guy since high school. Two degrees later (for her anyway), they finally had the big traditional Vietnamese engagement party. Here she is in an ao dai. Perfection.

Photobucket

First one out of my group of college friends to get engaged. The cup says Bride, in case you couldn't tell. I know, with that little tidbit, it's like you're right there witnessing the joy.

Photobucket

She's amazing as well. Law review, teaching fellow, heading off to a big white shoe firm for the summer. The good ones do get taken first.

In unrelated news, I finally redeemed some rewards points from the school's research system to get a tripod. Hopefully this will spare you from any more of my self-taken shots, but then that just means you'll be subjected to awkward posing.

Until next time!


Monday, June 13, 2011

I have no life

me (to Kevin, via webcam): You can't leave to watch Hulu!
Kevin: Okay, you entertain me then. Tell me a story.
me: Hrmm. (pulls out Barbri practice exam) Art and Bill agree to kidnap Vickie. . . .
Kevin: Thumbs down. Change channel.